Hugo Essentials
Table of Contents
Getting Started
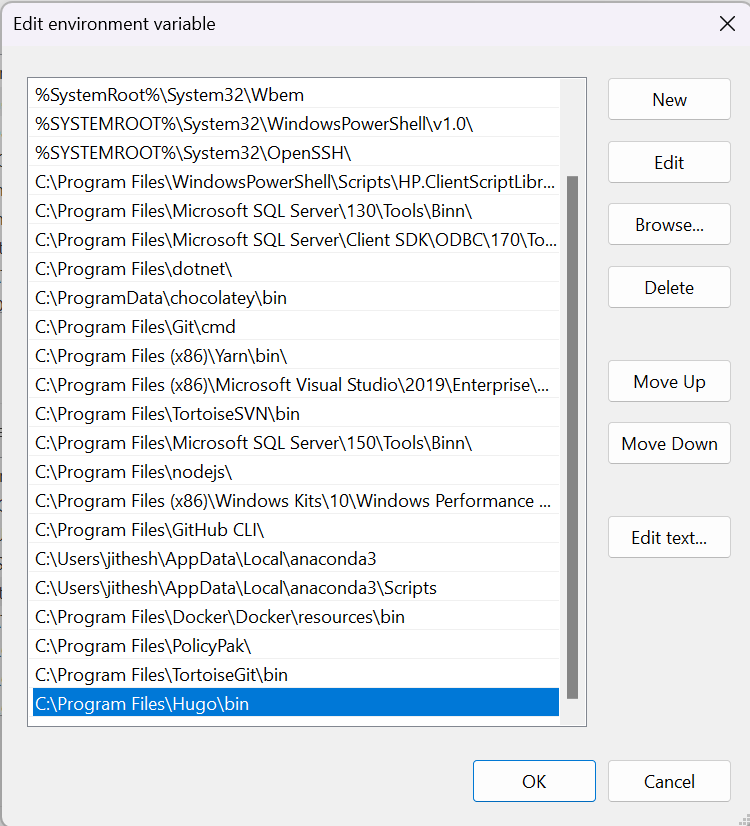
To install Hugo in my windows PC, all I did was download the binary image (x64). Create a folder Hugo/bin in the Program Files and paste it there. Then edited the System Environment variable and add that to the path. Please refer the video.
How to Install Hugo on Windows - YouTube
Now with hugo installed let us create a site as shown below.
hugo new site hugo-demo
Adding Theme
I am using a theme called hugo-blog-awesome and planning to use it as a submodule.
git init
git submodule add https://github.com/hugo-sid/hugo-blog-awesome.git themes/hugo-blog-awesome
Setup Config
baseURL = "https://jithesh.io/"

languageCode = "en-us"

defaultContentLanguage = "en-us"

title = "Jithesh"

theme = "hugo-blog-awesome"


[markup]

  [markup.highlight]

    noClasses = false


  [markup.goldmark.renderer]

    unsafe = true


  [markup.tableOfContents]

    startLevel = 2   # ToC starts from H2

    endLevel = 4     # ToC ends at H4

    ordered = false  # Generates <ul> instead of <ol>


[languages]

  [languages.en-us]

    languageName = "English"


    [languages.en-us.menu]

      [[languages.en-us.menu.main]]

        pageRef = "/"

        name = "Home"

        url = "/"

        weight = 10


      [[languages.en-us.menu.main]]

        pageRef = "posts"

        name = "Posts"

        url = "/posts/"

        weight = 20


      [[languages.en-us.menu.main]]

        pageRef = "about"

        name = "About"

        url = "/about/"

        weight = 30


      [[languages.en-us.menu.main]]

        pageRef = "categories"

        name = "Categories"

        url = "/categories/"

        weight = 40


    [languages.en-us.params]

      [languages.en-us.params.author]

        avatar = "avatar.png"  # Ensure this file is placed in the assets folder

        intro = "Jithesh Chandrasekharan"

        name = "Jithesh Chandrasekharan"

        description = "A passionate software engineer sharing insights and experiences across evolving technologies."
Paste your avatar.png in the assets folder of your blog. Ensure that image is a square image.
Creating Posts and Pages
This create a new post in content/posts/react folder. In order to keep the images for a post next to it , I am doing paged bundle. That means the content should be in index.md and images next to it in the same folder.
- Leaf Page Bundle: When Hugo sees a directory with an
index.mdfile, it treats that directory as a leaf bundle, meaning that everything in the directory (like images, videos, etc.) is considered part of the same “page.” - Page Resources: Any images or resources placed in the same folder will be available for use within that page, and you can reference them directly in your Markdown.
Example :
content/
└── posts/
    └── my-post/
        ├── index.md  # This is your post
        └── image.png  # This is your image
In your index.md file, you can reference the image like this:

To create a page in Hugo using a leaf page bundle, you’ll need to follow a specific directory structure. A leaf page bundle consists of an index.md file inside a directory, along with any resources (images, files, etc.) you want to associate with that page.
Here’s a step-by-step guide:
Step 1: Create the Directory for Your Leaf Page Bundle
Navigate to the content/ directory of your Hugo project and create a new directory for your page. This directory will hold the index.md file and any associated resources (like images).
mkdir -p content/posts/my-leaf-page
This creates a directory named my-leaf-page under content/posts/.
Step 2: Create the index.md File
Inside the newly created directory, create an index.md file. This is where the content for the page will go.
touch content/posts/my-leaf-page/index.md
Step 3: Add Content to the index.md File
Open index.md in your favorite text editor, and add the following front matter and content:
+++
title = "My Leaf Page"
date = 2024-09-03T18:00:00-07:00
categories = ["Category1"]
tags = ["Tag1", "Tag2"]
+++
## This is a Leaf Page Bundle
Here’s an image from the same folder:

- The front matter (
+++) contains metadata like the title, date, categories, and tags. - You can add Markdown content below the front matter.
Step 4: Add Resources (Optional)
If you have any resources, such as images, that you want to include with the page, place them in the same directory. For example, if you want to include an image, save it as image.png in the my-leaf-page/ directory:
content/
└── posts/
    └── my-leaf-page/
        ├── index.md
        └── image.png
Step 5: Reference Resources in the Page
In your index.md, you can now reference the image using a relative path:

Hugo will automatically handle the image as part of the leaf page bundle, and the image will be copied to the appropriate location during the build process.
Step 6: Build and Test the Site
After creating the leaf page bundle, you can run Hugo’s development server to test the page locally:
hugo server
Visit the local development server (usually http://localhost:1313) and navigate to the new page, which will be available at http://localhost:1313/posts/my-leaf-page/.
Summary:
- Create a directory under
content/(e.g.,content/posts/my-leaf-page). - Create an
index.mdfile in the directory. - Add your page content and any resources (like images) to the same directory.
- Reference resources with relative paths (e.g.,
). - Build and test the site using
hugo server.
By using this structure, you’re creating a leaf page bundle, and Hugo will treat everything in that directory as part of the same page, allowing you to easily manage content and resources together.
Let me know if you need further help!
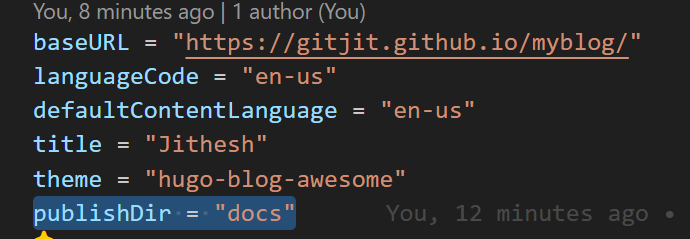
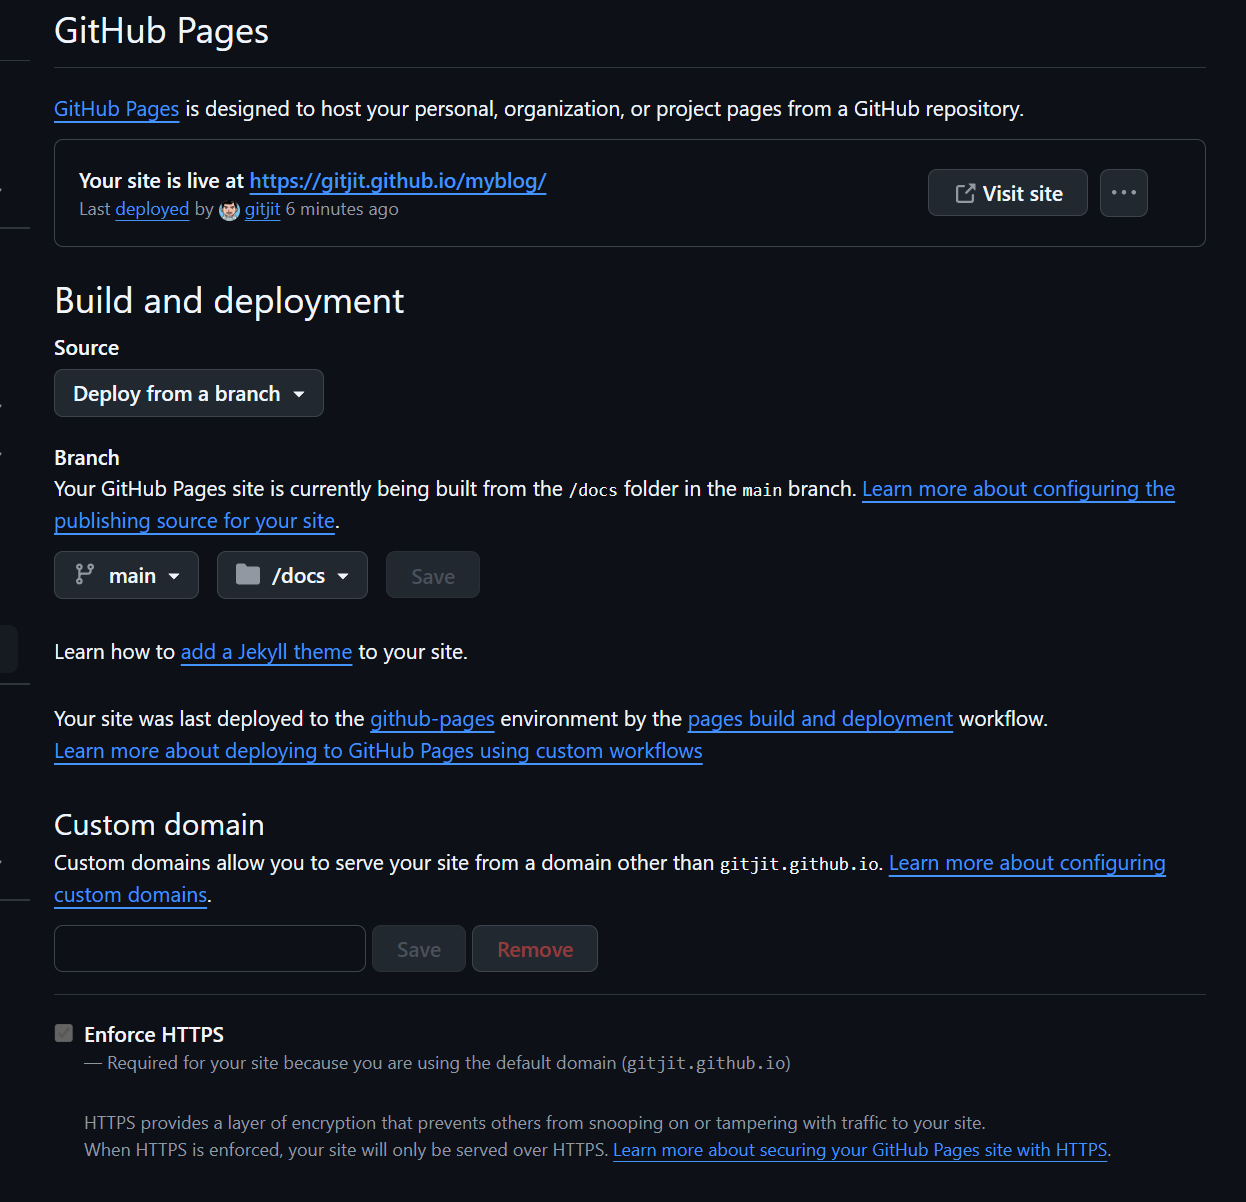
Deployment
For simplicity I am using git hub pages docs deployment. That means we have to move our files publish folder to docs instead of public and we have to set the gh-pages options in Git Hub settings.
Update hugo.toml to set publish directory.
Every time you make any changes or add posts, you have to run manually hugo command that will move the files to docs folder and you need to commit and push.
$hugo
Adding Tags/Categories overriding the Theme
Here’s a summarized guide of how we added and customized Categories in Hugo, using terms.html for rendering, along with custom CSS styling:
1. Creating and Customizing the terms.html for Categories
To customize how categories are displayed, we created a terms.html file, placed it in your site’s _default layout folder to override the theme’s default layout, and customized it to display categories with post counts and the last post date.
Steps:
- Create the
terms.htmlfile:- File path:
layouts/_default/terms.html. - This file is responsible for rendering the list of categories (terms) on the categories page.
- File path:
Sample terms.html:
{{- define "main" -}}
<div class="wrapper list-page">
    <header class="header">
        <h1 class="header-title center">{{ .Title }}</h1>
    </header>
    <main class="page-content" aria-label="Content">
        <!-- Loop through categories and display them -->
        {{ range .Data.Terms }}
        <div class="category-item row">
            <!-- Category Name with Post Count -->
            <div class="category-name column">
                <a href="{{ .Page.Permalink }}">{{ .Page.Title }} ({{ .Count }})</a>
            </div>
            <!-- Last Post Date -->
            <div class="category-last-date column">
                {{ with (index .Pages.ByDate 0) }}
                    {{ .Date.Format "2 Jan 2006" }}
                {{ else }}
                    No posts
                {{ end }}
            </div>
        </div>
        {{ end }}
    </main>
</div>
{{- end -}}
2. Adding and Customizing CSS for Categories
To apply custom styling for categories, we created a custom.scss file, placed it in the assets/scss folder, and referenced it in the head.html file.
Steps:
- Create the
custom.scssfile:- File path:
assets/scss/custom.scss. - This file contains the custom styles for the categories page.
- File path:
Sample custom.scss:
.category-item {
    display: flex;
    justify-content: space-between;
    padding: 10px 0;
    border-bottom: 1px solid #333;
}

.category-name {
    flex: 1;
    font-weight: bold;
}

.category-last-date {
    text-align: right;
    color: #999;
}
3. Modifying head.html to Include Custom CSS
To ensure that the custom CSS is applied, we copied the head.html file from the theme and modified it to include our custom SCSS file. We placed the modified head.html in the layouts/partials folder in our site.
Steps:
Copy the
head.htmlfrom the theme:- File path:
themes/<your-theme>/layouts/partials/head.html. - Copy it to:
layouts/partials/head.htmlin your site folder.
- File path:
Modify
head.htmlto include custom SCSS: Add the following code tohead.htmlto compile and include yourcustom.scss:
{{- $style := resources.Get "sass/main.scss" | resources.ExecuteAsTemplate "style.scss" . | toCSS (dict "targetPath" "style.css") | minify | fingerprint }}
<link href="{{ $style.RelPermalink }}" rel="stylesheet">

<!-- Add custom SCSS file -->
{{- $customStyle := resources.Get "scss/custom.scss" | toCSS | minify | fingerprint }}
<link href="{{ $customStyle.RelPermalink }}" rel="stylesheet">
4. Test Your Site
Once you’ve added the terms.html, custom SCSS, and updated head.html, test your site to make sure the categories page is rendered correctly with the custom styles.
Steps:
- Run Hugo locally to verify the changes:
hugo server - Navigate to
/categories/to see if the categories are listed with their names, post counts, and last post date, along with the custom styling.
Summary of Steps:
Override Categories Template:
- Create
terms.htmlinlayouts/_default/terms.htmlto customize how categories are rendered. - Display category name, post count, and last post date.
- Create
Add Custom Styles:
- Create
assets/scss/custom.scssfor styling categories.
- Create
Modify
head.html:- Copy
head.htmlfrom the theme tolayouts/partials/head.html. - Add the custom SCSS reference in
head.htmlto include it in your site.
- Copy
Test Your Site:
- Run Hugo and navigate to the categories page to ensure everything works as expected.
This approach allows you to fully customize how your categories page looks and behaves while maintaining separation from the theme for easier future updates. Let me know if you need any further clarification!
References
Hugo Blog Tutorial: Setting up Hugo and installing a theme - YouTube